
This article is about why email security matters for e-commerce brands. If you’re looking for an example of setting DKIM, SPF & DMARC records, we recorded a video on Setting SPF, DKIM and DMARC Domain Records, go there if you’re looking for a step by step guide on setting these actual records in a DNS system, and bookmark for later!
Introduction
Modern email authentication and security
Sending and receiving secure email is more important now than ever! Spammers, scammers, spoofers, and phishers can cause serious damage to individuals and businesses and despite greater awareness, those attacks are increasing in complexity and frequency.
“Gmail’s AI-powered defenses stop more than 99.9% of spam, phishing and malware from reaching inboxes and block nearly 15 billion unwanted emails every day. But now, nearly 20 years after Gmail launched, the threats we face are more complex and pressing than ever.”
Gmail, source
Email providers need our help
Though we rely on our advanced email service providers to help keep our data secure and our communications delivered, and despite their best efforts, ESPs like Gmail need our help sometimes too!
To ensure the email they send for us gets delivered, we configure our email settings according to best practices, and we do that by creating specific records (SPF, DKIM, and DMARC) within the DNS provider of our domain name.
Gmail and Yahoo Mail, two of the largest email service providers, recently announced plans to enact stricter criteria for the email they receive on behalf of their millions of users. This led other businesses and platforms that send email on behalf of their users, like Help Scout and Shopify, to ask their users to provide authentication updates to DKIM, SPF, and DMARC, in order to continue to ensure security, deliverability, and brand identity with these changes.
“Starting February 1, 2024, all senders who send email to Gmail accounts must meet the requirements in this section…[to] set up SPF or DKIM email authentication for your domain.” – The folks at Gmail
Gmail’s full list of requirements from their “Email sender guidelines” article includes separate but overlapping lists for normal and high-volume senders. The list includes 7-10 criteria depending if you send more than 5,000 emails per day, but SPF, DKIM, and DMARC relate to each requirement list.
As part of SellerSmile’s ongoing commitment to ensuring the highest standards of email security, deliverability, and brand identity, we’re officially implementing and advocating all three of the industry best-practices for email authentication; SPF, DKIM, and DMARC for all email communications.
The solution to email spam: DKIM, SPF, and DMARC
Before we cover how to activate each authentication method for your custom domain, let’s get to know them.
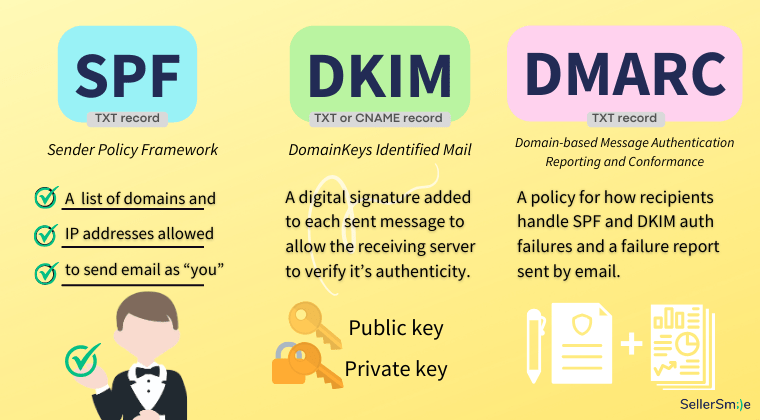
1) Sender Policy Framework (SPF)
- Format: a DNS TXT record
- A list of domains and IP addresses allowed to send email as “you.”
2) DomainKeys Identified Mail (DKIM)
- Format: a DNS TXT record or two DNS CNAME records
- A digital signature added to each sent message to allow the receiving server to verify its authenticity. Uses a public and a private key.
3) Domain-based Message Authentication Reporting and Conformance (DMARC)
- Format: a DNS TXT record
- A policy for how recipients should handle SPF and DKIM authentication failures and a failure report sent by email.
Together, these three email authentication methods work together to ensure your emails reach your customers while helping to prevent bad actors and other unauthorized entities from trying to send emails that appear to be from your domain!
Even though activating these three methods is a relatively simple task and can be verified in a few hours, a reminder to use caution when creating and editing DNS records, since some vital business functions may rely on these records.
If you have a site administrator, developer, or technical colleague, please include them in this task.
How to activate SPF for your domain
Activating an SPF record for email authentication involves the following steps:
- First, learn about SPF: How it works in email authentication. Read more, “Add your SPF record at your domain provider”
- Access DNS Settings: Log in to your domain registrar’s or DNS hosting provider’s website.
- Locate DNS Management: Find the DNS management or domain settings section.
- Add a new DNS record, a TXT Record: Some providers label it as “TXT,” “Text,” or “SPF.”
- Enter SPF Information: In the TXT record, input your SPF information. A basic SPF record looks like: v=spf1 include:_spf.yourdomain.com -all
- Include Mechanism: The include mechanism specifies authorized servers. Replace _spf.yourdomain.com with your authorized email servers or providers.
- SPF failure is of two types; SPF softfail (~all) and SPF hardfail (-all). SPF soft fail instructs receiving mail servers to allow unauthorized emails, but they must be tagged as spam or suspicious. While on the other hand, SPF hardfail commands to outrightly reject such emails. However, on setting the TXT record to SPF hardfail, sometimes genuine emails can also get rejected due to SMTP relaying, which can be problematic. Therefore, consider both mechanisms’ pros and cons before deciding which one you want.
- Save Changes: Updates to your DNS records should be available within hours.
- Check SPF Record: Use SPF checking tools to verify your SPF record’s correctness.
- Regularly Update: Update SPF records when your email infrastructure changes.
SPF records are just one of the three email authentication methods. Implement DKIM and DMARC for a comprehensive approach.
How to activate DKIM for your domain
Activating DKIM helps ensure the integrity of your email communications and prevents email spoofing. Follow these steps to activate DKIM for your domain:
- First, learn about DKIM: How it works in email authentication. We refer to, “Help prevent spoofing and spam with DKIM” from Google Workspace Admin Help.
- Access DNS Settings: Log in to your domain registrar’s or DNS hosting provider’s website.
- Locate DNS Management: Find the DNS management or domain settings section.
- Generate DKIM Keys: Using your email server or a DKIM key generator.
- Copy DKIM Public Key: Copy the public key generated by your DKIM process.
- Create DKIM TXT Record: Add a new TXT record to your DNS settings for DKIM.
- Enter DKIM Information: The TXT record typically looks like this: selector._domainkey.yourdomain.com IN TXT “v=DKIM1; k=rsa; p=your_public_key”
- selector: A unique identifier for the specific DKIM key.
- _domainkey: A constant part of the DKIM DNS record.
- yourdomain.com: Replace with your actual domain.
- v=DKIM1: Indicates the use of DKIM version 1.
- k=rsa: Specifies the key type (RSA).
- p=your_public_key: Paste the DKIM public key generated.
- Save Changes: Save the changes to update your DNS records.
- Check DKIM Record: Use DKIM checking tools to verify your DKIM record’s correctness.
- Configure Email Server: Configure your server to sign outgoing emails with the private key.
- Send Test Emails: Send test emails to verify that DKIM signatures are applied.
- Monitor DKIM Status: Regularly monitor DKIM status using email authentication tools.
- Revise Keys Periodically: For security, consider changing DKIM keys on a schedule.
After SPF and DKIM are activated by the sending server, not only does each email have a lesser chance of being blocked, but the emails that do get delivered will appear more secure and better to the customer, devoid of any other confusing and known third party domain names or confusing messages.
As a customer service agency sending email on behalf of dozens of clients we’ve encountered a few examples where customers will notice and inquire about the extra text that may appear around the email they received.
Without DKIM active, extra information may appear next to sender’s name:
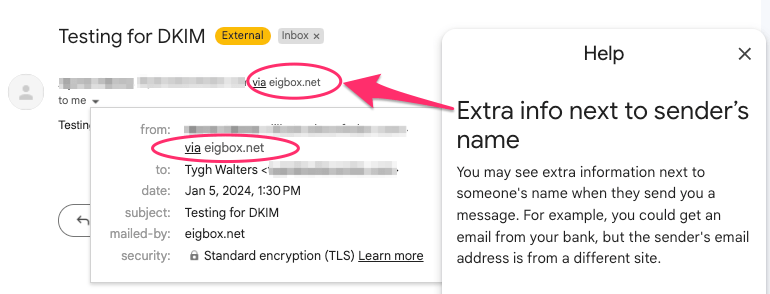
The common thread in this case is confusion and some customers voice their concern about the legitimacy of these communications.
When your customers are corresponding about private details like their home address or financial details around a refund it matters that extra care is taken to retain the customer’s trust around privacy throughout the interaction.
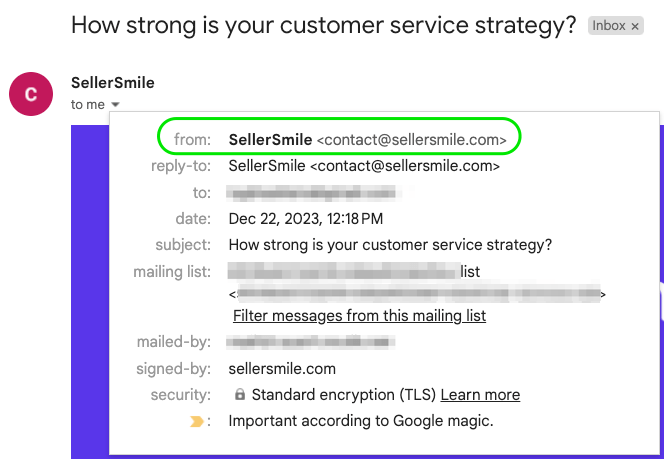
With DKIM active, no extra information appears next to sender’s name:
How to activate DMARC for your domain
After SPF and DKIM is active, creating DMARC (Domain-based Message Authentication, Reporting, and Conformance) for email authentication involves making a new TXT record in your DNS.
Follow these steps to activate DMARC for your domain:
- First, understand DMARC: Learn about it and its benefits in email authentication.
- Review SPF and DKIM: Ensure that you have already implemented SPF (Sender Policy Framework) and DKIM (DomainKeys Identified Mail) for your domain.
- Access DNS Settings: Log in to your domain registrar’s or DNS hosting provider’s website.
- Locate DNS Management: Find the DNS management or domain settings section.
- Add a new DNS record, a DMARC TXT Record:
- Enter DMARC Policy: Input your DMARC policy. A basic DMARC record looks like: v=DMARC1; p=none; rua=mailto:postmaster@yourdomain.com
- Customize the policy according to your needs. p=none: Specifies a monitoring-only policy. You can change it to p=quarantine or p=reject for enforcement.
- rua=mailto:postmaster@yourdomain.com: Sets up email reports. Replace with your email address.
- Save Changes: Note, a domain can only have one DMARC record.
- Check DMARC Record: Use DMARC checking tools to verify your DMARC record’s correctness.
- Monitor DMARC Reports: Configure DMARC reports to be sent to the specified email address.
- Gradual Enforcement: If not already in place, start with a monitoring-only policy (p=none) and gradually move to enforcement.
- Regularly Review Reports: Periodically read DMARC reports to ensure legitimate email sources align with your policy.
- Adjust Policy: Based on reports, adjust your DMARC policy for better email authentication.
Implementing DMARC enhances email security and helps protect your domain from phishing attacks. Regularly review and update your DMARC policy for optimal results.
You may repeat these tasks, create SPF, DKIM, and DMARC records for each domain you own.
Your brand identity and a branded email domain
The best brands have branded email, an address that matches what the customer expects and draws no attention away from that.
For example, instead of sending your store’s email from a domain that does not match your brand name, like “brandname(at)gmail.com” or “brandname(@)shopify.com”, the best brands send from custom, branded domains, like XYZ(@)brandname.com. It’s that end part, the “(@)brandname.com” that gets scrutinized by spam filters and authentication methods.
Having the right domain sending your mail and the proper DNS records to match help your email messages pass through spam filters to get delivered, and then appear to your customer without the distraction of an unrelated, and sometimes suspicious-looking name.
Email authentication for e-commerce
Business owners selling and supporting physical products require that all email (transactional, marketing, support, etc.) is delivered with the highest security, authenticity, and success rate to their customers’ mailboxes.
Enabling authentication for email communications may require the creation of DNS records to satisfy several platforms, depending on the platforms and technologies at play,
Shopify merchants & email authentication
Like Gmail and Yahoo, Shopify issued a similar announcement about requiring their merchants to enable email authentication.
“As of February 1, 2024, Gmail and Yahoo will require you to authenticate your domain and have a DMARC record in order to send emails to customers from a branded email address. If you take no action, then your sender email will be rewritten to no-reply@shopifyemail.com to meet the minimum requirements so that you can continue sending emails to your customers without interruption.” – Shopify, Authenticate your third-party domain.
Shopify merchants have both a “store owner email” and a “sender email”, in this article we’re primarily referring to customer-facing sender email, which receives all customer communication and replies to your store’s order event notifications. Your sender email is the email address your customer service team is managing.
Activating CNAME and DMARC for Shopify
Shopify advises activating CNAME and DMARC records to authenticate your third-party domain.
- First, read and learn. We recommend reviewing the “Authenticate your third-party domain” section of “Setting up your email” by Shopify
- Second, add CNAME records to your third-party domain
- Third, add a DMARC record to your third-party domain
- Last, verify the change worked in your Shopify Admin.
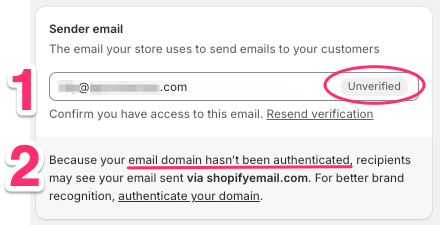
Related, but not the same as authentication, is email verification. Prove you have access to the sender email, read “Verifying your email addresses” by Shopify for more.
Here’s a view of the sender email field in Shopify. Notice two pending tasks, 1) email verification and 2) domain authentication.
Amazon sellers & email authentication
In the Amazon Marketplace and unlike Shopify, the customer is owned by Amazon and the seller has more of a third party relationship or limited access to the customer and the sale.
The work is already done by Amazon, they use the secure Buyer-Seller Messaging system for all email communications between sellers and the buyers that purchase their products. This system operates with encrypted email addresses and only AMZ-domains for both the buyer and the seller to increase privacy and security.
Since Amazon is sending email from their servers on your behalf from a domain they own and choose, they do all the hard work for you. There is no maintenance needed to make sure the messages sellers send are authentic.
Even though there’s no circumventing Buyer-Seller Messaging, AMZ sellers can still correspond with AMZ buyers from their favorite CRM, simply by forwarding to a support email and authorizing the proper senders in Seller Central settings > User Permissions.
More Q&A about email authentication
Why do you recommend both SPF and DKIM since only one passing method may be required to get delivered?
It’s our understanding that receiving mail servers write their own rules, to a degree, so since we can’t predict how they’ll implement their spam filters, our stance is to give them as much correct information as possible.
Further, it’s our opinion that email clients may to display messages or warnings of suspicion around the email you send if one of the methods (SPF or DKIM) is absent or does not pass.
For example, Yahoo Mail requires either/or SPF or DKIM for small senders but both methods for larger senders. If they or Google ever require both and you’re a smaller sender, then you’re all set!
Why does Shopify only ask merchants to use DKIM and not SPF?
Not sure yet here. Our guess is that they may have an opinion that SPF is lesser and since only one of the two must succeed for emails to get delivered, they may be betting it all on DKIM + DMARC.
Why do you recommend DMARC if I have SPF and/or DKIM?
Because Google and Yahoo, two very large email service providers, decided that it will be a requirement for all senders. “Yahoo strongly urges all senders to publish a DMARC policy for each domain that sends mail. For some senders, this is now a requirement”
DMARC allows your brand to play defense, with control over how the spammy emails related to your domain should get treated: delivered, flagged, or rejected, with an option to receive a free report every day!
If for some reason your SPF or DKIM records are set but incorrect or become obsolete over time, your emails could begin tripping spam filters and get blocked without you knowing it. The DMARC allows you to indicate what happens to those email messages (nothing, flag, or reject) and receive that free activity report so you know what’s happening with your domain out there.
Summary
In an online shopping world filled with bad actors and ever-stickier spam filters, enabling the three email authentication methods, DKIM, SPF, and DMARC, will ensure that your emails reach your customers with the highest level of deliverability and integrity.
What’s your experience with DKIM, SPF, and DMARC? Any issues getting your email delivered to your customers? We want to hear about it, leave a comment below.
As always, we invite you to schedule a call with SellerSmile today to review your e-commerce customer service today!
Helpful articles and resources
- “New Gmail protections for a safer, less spammy inbox” – Gmail’s announcement
- “More Secure, Less Spam: Enforcing Email Standards for a Better Experience” – Yahoo Mail’s announcement
- “Email sender guidelines” by Gmail Help
- “Email sender guidelines FAQ” by Gmail Help
- “Add your DMARC record” by Gmail Help
- Articles, Tutorials and Videos” from DMARC.org. Their mission is to “promote the use of DMARC and related email authentication technologies to reduce fraudulent email, in a way that can be sustained at Internet scale.”
- Help Scout article: “Use DKIM to Help With Email Delivery”
- “Setting up your email” by Shopify
- “Help prevent spoofing and spam with DKIM” from Google
This Post Has 4 Comments
Pingback: E-commerce Customer Service - SellerSmile
Pingback: 5 Best Practices for Your Customer Service Email Address - SellerSmile
Pingback: Introduction to Email Authentication - SellerSmile
Pingback: Setting SPF, DKIM and DMARC Domain Records with Bluehost and Gmail - SellerSmile